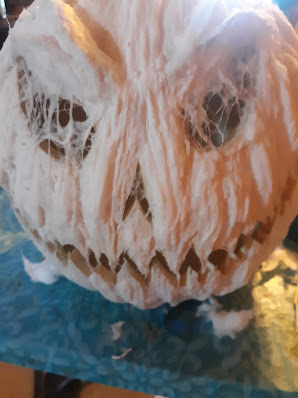
There are so many ways to take something pristine and make it look dead and decayed!
One of my favorites is using cotton balls and glue. I know lots of folks like using cotton balls and latex, and I admit, latex gives a look and feel you just cannot get with glue. That said, I advocate for glue for two main reasons:
1. A gallon of white PVA glue goes for around $13. A gallon of liquid latex is around $50.
2. Latex breaks down over time. It REALLY breaks down in the heat. I have not noticed this with glue.
I thought I'd share my very basic method for using cotton and glue. I don't remember where I first learned this method exactly, but the first person I remember hearing about corpsing JoLs from was Denny "Denhaunt" Stanley on HauntCast back in 2012.
I started with a white pumpkin form Michael's, but of course it could be anything, even a paper mache pumpkin or a plastic Trick or Treat bucket. Just drew out the face and carved it with a hot knife.
I wanted to add some dimension to my JoL's eyebrows, so I used aluminum foil for that, and taped it in place. In the end, I glued these down, but if I'd used better tape it would have been fine.
I wanted fine threads hanging down over the eyes, so I put some shredded cheesecloth over the eyes now. Could have done it later, but I'm not really a fan of the cheesecloth over the cotton - at least when I'm using glue instead of latex. I DO like to put the cheesecloth all over the JoL first, then just use the cotton to build up. That looks cool to me.
Sometimes, I mix up a 50/50 mix of glue and water and just dunk the cotton into that. The result is a flatter layer of cotton that is also firmer when it dries. To get real dimensionality though, you have to use 2-3 times the cotton balls, which really adds to the time. Instead, I painted the pumpkin with the white glue, then stuck the unrolled cotton balls right to that.
After the fluffy cotton was stuck down, I brushed the water/glue mixture over the cotton with a chip brush. I took care to really push is down in the valleys and just brush lightly over the crests of the ribs.
For more detail, I dipped some of the cotton balls into the mixture and really stretched and tore them so I could put them over the eyes without blocking the light in the finished piece.
Then, before setting it out to dry, I took a toothpick and added all the lines into the ribs. I think that gives a nice "woody" texture that kind of implies age.
Next step - Paint!
Happy Halloween!


Comments
Post a Comment
Comment here!